Surya Namaskar / Sun Salutation
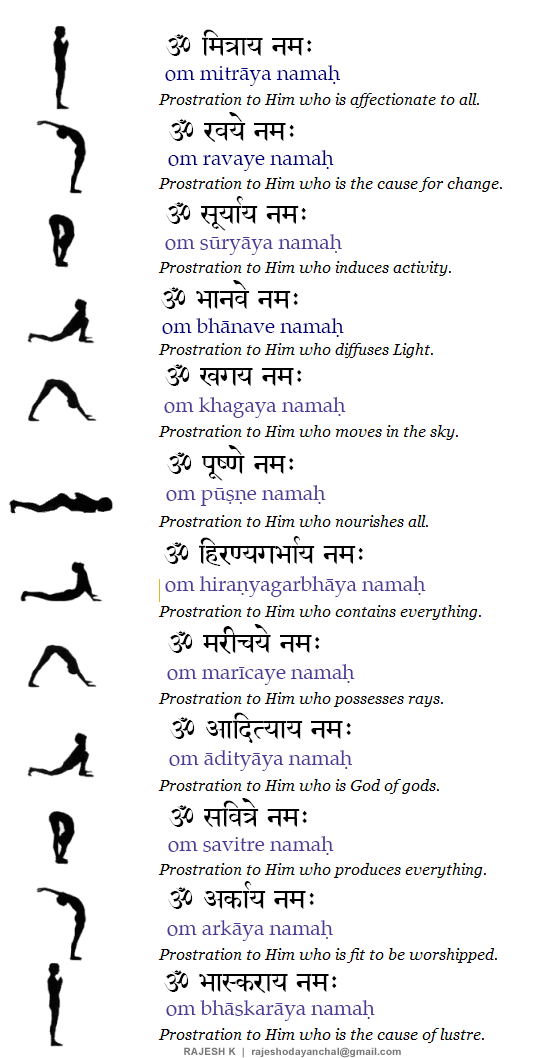
Toward off the malefic effects of Sun, Surya Namaskar in 12 poses should be performed at least five times daily. While performing this yogic exercise, the relevant mantras should be uttered for each posture as mentioned below. After Surya namaskar shavasan should be performed for about five minutes. The twelve mantras are as under :-
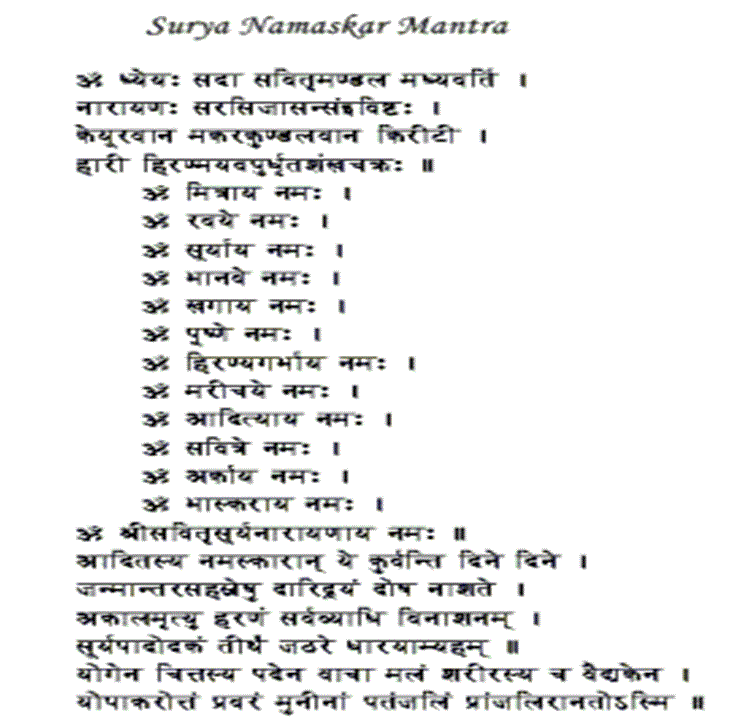
Surya Namaskar Mantra:

||Steps of surya namaskar||

Step I: Stand facing the Sun with both feet touching each other. Inhale and maintain the position as shown in figure I in standing position with hands joined together near to chest, feet together and toes touching each other. Now recite the first mantra in correct metre.
Step II: Inhale and raise the arms upward. Slowly bend backward, stretching arms above the head by holding the breath.
Step III: Exhale slowly and bend forward, touching the ground in line with the toes until the hands are in line with the feets, head touching the knees. Don’t bend knees while performing the third step. At first you may find it difficult to attain the ideal position but try to bend as much as possible without bending in knees.
Dos
– While exhaling bend forward by the waist.
-Try to touch the forehead to the knees.
– Relax the neck.
Don’ts
– Do not bend the knees.
– Do not keep the neck tense.
Step IV: Raise the head. Inhale and move the left leg back away from the body in a wide backward step keeping the left toes on the floor. Keep the hands and feet firmly on the ground, with the left foot between the hands. Press the waist downwards arid raise the neck, stretch the chest forward and push shoulders backwards. Keep the right leg and both the hands in the same position. Keep the right leg folded.
Dos
– The knee of the right leg should be bent
The knee of the left leg should touch the ground
– Drop the waist/ hips towards the ground but do not touch it.
– Gaze in upward direction and keep both arms straight
Don’ts
– Do not bend the neck forward. – Do not bend the elbows.
Step V: While exhaling, bring the right foot together with the left. Keep anus straight, raise the hips and align the head with the arms, forming an upward arch. Hold the breath and raise the knee of left leg.
Dos
– Take the right leg hack and place it beside the left leg, keeping the toes erect.
– Keep the body in arch position.
-Keep the arms straight.
-Gaze downwards.
Don’ts
-Do not bend the arms
– Do not drop the hips/waist towards the floor
-Do not bend the knees
Step VI: Exhale and lower the body to the floor until the feet, knees, hands, chest, and forehead are touching the ground. Since only eight parts rest on the ground, it is called ‘Ashtanga’ position.
Dos
– Bring the body towards the floor placing the parts on the floor: Toes, knees, chest, palms, and forehead
– Keep the hands close to the body, next to the shoulders
-Keep the elbows pointed to the sky and close in to the body
Don’ts
– Do not touch the thighs, hips, waist or abdomen to the floor
– Do not touch the chin to the floor
– Do not let the elbows fall away from the body
Step VII: Inhale and slowly raise the head and bend backward as much as possible, bending the spine to the maximum (as in the naga-asana). Push the neck backwards and site upwards.
Dos
-Push the upper body upwards so that the arms are straight
-Keep the fingers pointed forwards, palms on the ground, and thumbs at 90 degree angle
-Open the chest, pull the shoulders downwards
-Drop the head and neck backwards and gaze upwards towards the sky
-Keep the heels, legs and knees together
-Keep the toes erect
Don’ts
-Do not let the legs or heels be apart
-Do not bend the elbows
-Do not hunch the shoulders towards the ears.
Step VIII: While exhaling, bring the left foot together with the right. Keep arms straight, raise the hips and align the head with the arms, forming an upward arch. Hold the breath, bend the neck downwards and press the chin in the throat, push the body backwards and touch the heels on the ground, raise the waist upwards, do not move the palms on the floor.
Dos
– Push the body upward so the buttocks and waist are raised into the air, leaving the body in an arch position
-Take the head and chin towards the chest
-Try to touch the heels to the floor
Don’ts
-Do not bend the legs in the knees
– Do not bend the arms
Step IX: Inhale and move the right leg back away from the body in a wide backward step. Keep the hands and feet firmly on the ground, with the left foot between the hands. Raise the head. Hold the breath, bring the right leg in the front and place it in between the hands but instead of left leg in the front here take right leg and place left leg in the back with left knee and toes on the ground.
Dos
Take the right leg forward and place it between the hands
The knee of the right leg will be bent
The knee of the left leg should touch the ground
Drop the waist/ hips towards the floor
Gaze is upwards, both arms are straight
Don’ts
Do not bend the neck forward.
Do not bend the elbows.
Step X: Exhale slowly bending forward, touching the ground until the hands are in line with the feet and head touching knees. Exhale and bring the left leg forwards and place it in between both the arms.
Dos
Take the left leg forward and place it beside the right.
Palms touching the ground, fingers pointing forward, thumbs at 90 degree angle
Legs straight
Fry to touch the forehead to the knees
Relax the neck
Don’ts
Do not bend the knees.
Do not keep the neck tense.
Step XI: Inhale and raise the aims upward. Slowly bend backward, stretching arms above the head.
Step XII: Stand facing the direction of the sun with both feet touching. Bring the hands together, palm-to-palm, at the heart.
Other points to remember: – The articles for donation of Sun are Ruby, wheat, jaggery, Gold, Red Sandal, Red flowers etc. Classics are of the view that those persons who are not in a position of wearing the gems of Sun, which are very costly, may wear root of Bel which is not matured enough as a substitute.
 Astrologer Vinayak Bhaatt | Authentic Astrologer In India


